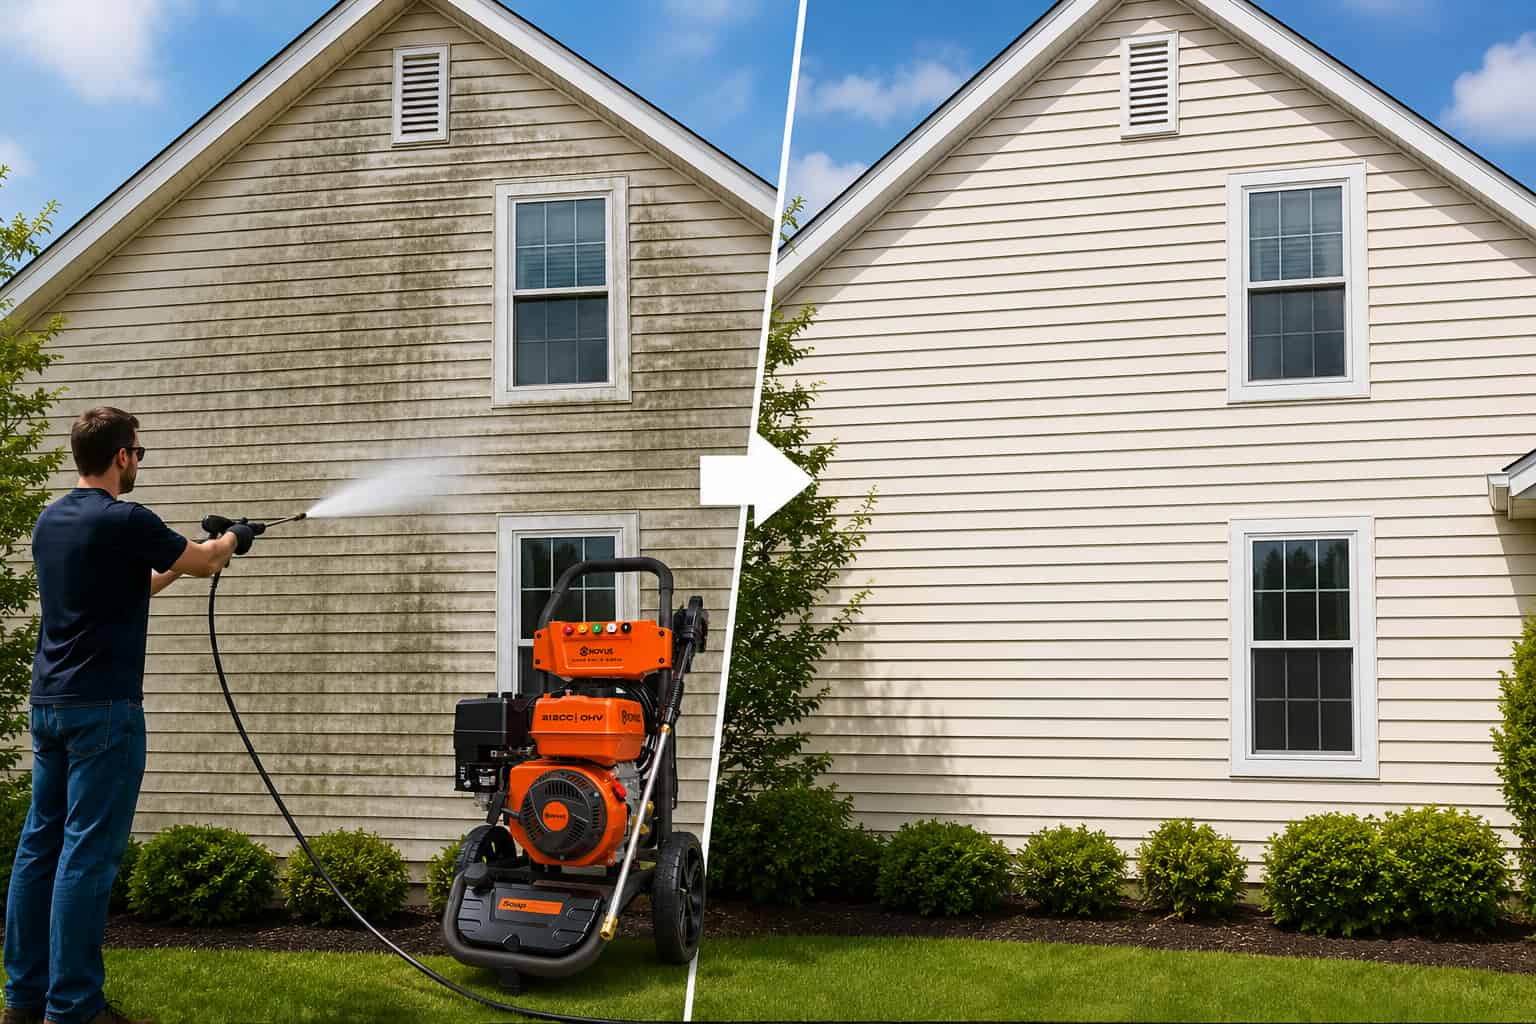
Over time dirt, mold, and mildew kinda build up on your homes exterior… and then it starts looking dull worn ,and if you let it sit there, you might even get long-term damage. Pressure washing is one of the more effective ways to revive your curb appeal, shield the siding, and prep those surfaces so paint sticks better. This guide kinda leads you through the whole thing : from picking the right gear, to that final rinse.
What Is Pressure Washing and Why Does Your House Need It?
Pressure Washing vs. Power Washing
These terms might be used interchangeably, but there is this kind of noticeable gap between the two, in particular power washing uses hot water, while pressure washing uses cold high pressure water. For any house exterior, regular pressure washing usually would work fine, so you dont really need to go beyond that.
Main Benefits
- Adds appeal – cleans years of grime, algae, stains, etc.
- Prevents damage – mold and mildew will destroy siding and paint over time
- Maintains property value – a clean-looking outside suggests well-maintained property
- Important prior to painting – a clean surface makes for much easier painting
How Often Should You Pressure Wash?
For most homes, once a year is usually enough. But in humid climates, or places that are heavily tree shaded, you might want to wash every 6–12 months, because mold and algae tend to come on faster.
What Equipment Do You Need?
Choosing a Pressure Washer
| Type | PSI Range | Best For |
| Electric | 1,300–2,000 PSI | Single-story homes, light-to-moderate grime |
| Gas-powered | 2,000–3,000+ PSI | Large homes, heavy staining, durable surfaces |
PSI guide by material:
- Vinyl siding: 2,500–3,000 PSI
- Wood, stucco, aluminum: 1,200–1,500 PSI
- Brick: 1,500–2,000 PSI (use caution — brick is porous)
- Painted surfaces: 1,200–1,500 PSI
Nozzle Types
| Nozzle | Angle | Use Case |
| Red | 0° | Avoid on siding — too intense |
| Yellow | 15° | Tough stains on concrete |
| Green | 25° | General house washing |
| White | 40° | Delicate surfaces, windows, trim |
| Black | Soap tip | Applying detergent |
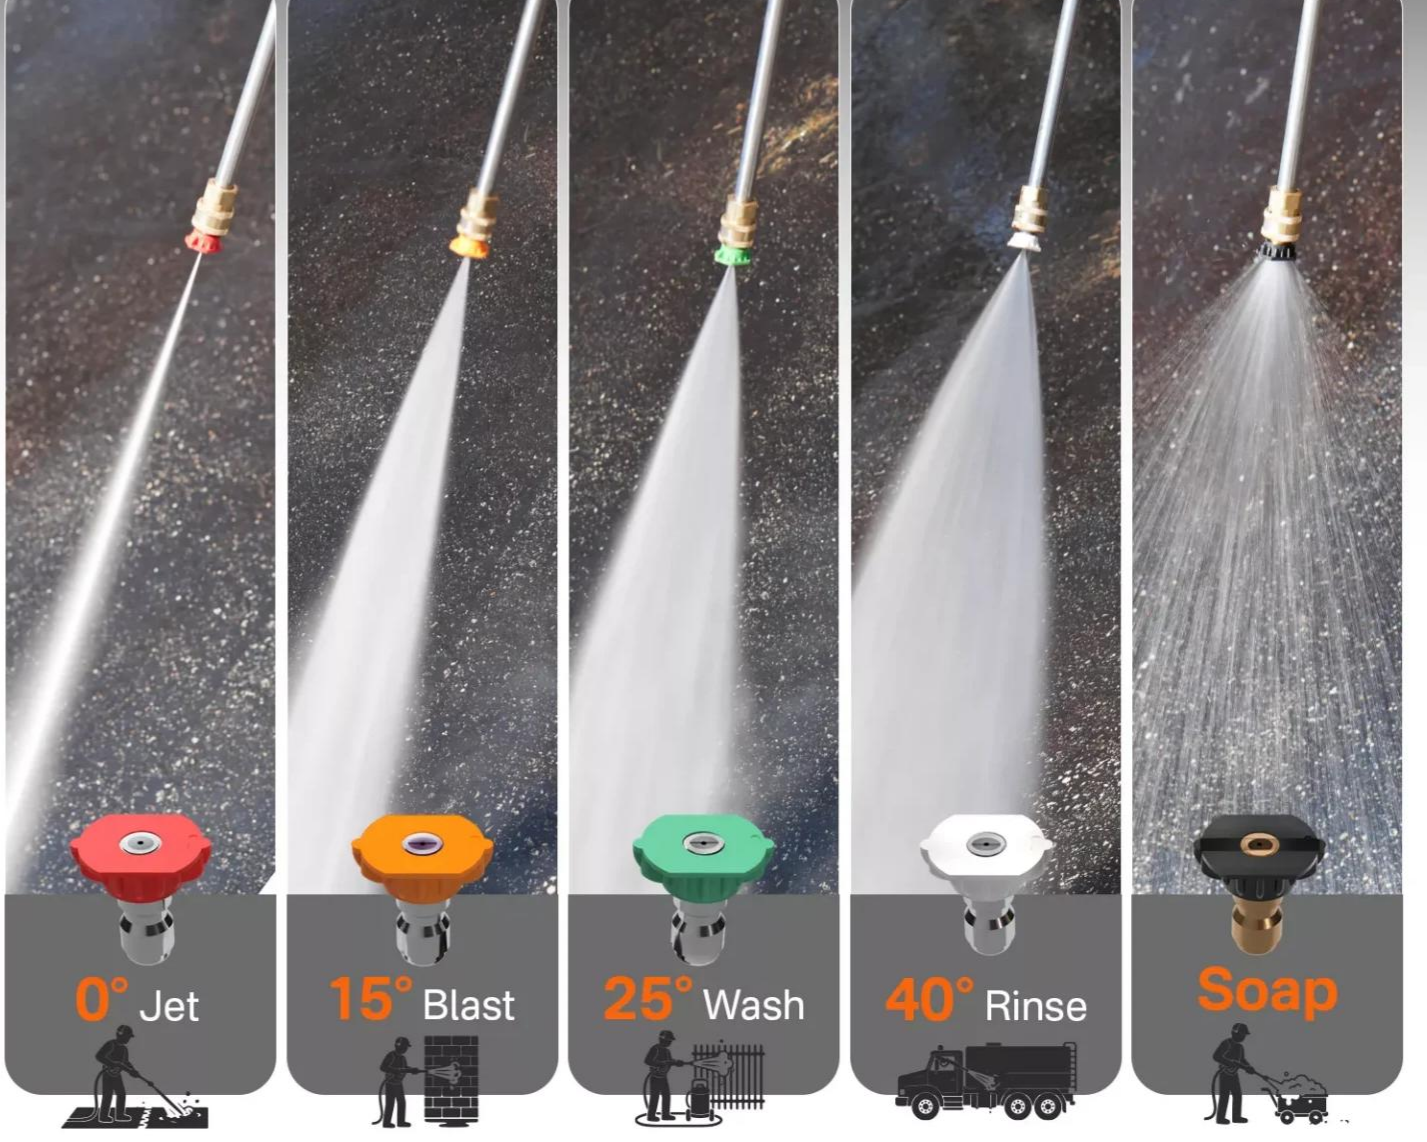
For most house washing, start with the 25° or 40° nozzle.
Other Supplies
- Exterior cleaning detergent or mildewcide solution
- Extension wand (for second-story reach)
- Safety goggles, waterproof gloves, non-slip closed-toe shoes
- Drop cloths or plastic sheeting
- Garden hose with sufficient water supply
Rent or Buy?
- Renting: ~$50–100/day — good for a one-time job
- Buying: $100–$600 for electric; $300–$1,000+ for gas — worthwhile if you’ll use it annually
How to Prepare Before Pressure Washing
Pick a suitable season. Honestly, the best stretches are spring, and autumn— that’s usually where you get the most agreeable timing. Try to keep the temperature in the 40–75°F (4–24°C) window. Don’t go with those scorching summer days, because the mixture starts to dry on the surface before you can rinse it off, and then the whole thing, kind of, doesn’t behave.
Organize the surrounding environment. Take out outdoor furniture, planters, garden hoses, as well as other decoration objects from the proximity of your home.
Provide protection for the weak spots. Use plastic film taped to windows and doors if you suspect leakage there. Cover light fixtures, air conditioners, outlets with covers. Place drop cloths over plants and shrubs.
Check the state of your house exterior. Walk around your property and examine it for loose boards, cracks, or rotten wood. If needed, repair these spots before cleaning, otherwise pressure water will penetrate the surface.
How to Pressure Wash a House: Step-by-Step
This is the core of the process. Work methodically, section by section, and never rush.
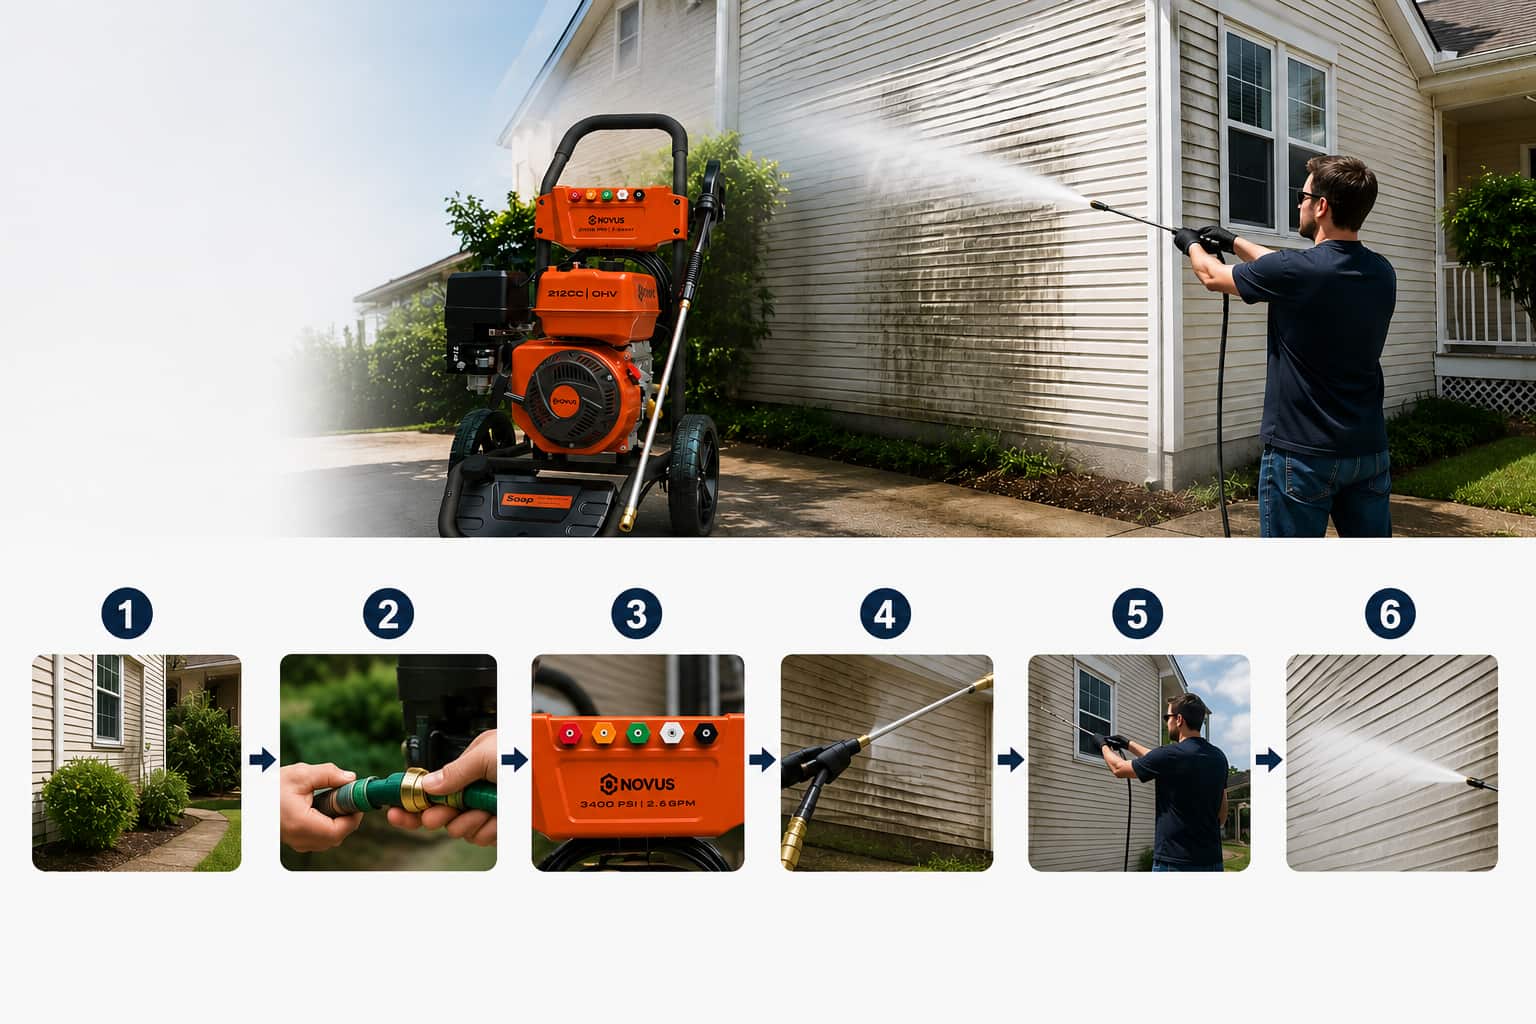
Step 1 — Set Up Your Equipment
Plug the garden hose into the water inlet port on your pressure washer. Mount the soap lance or detergent application device. Fuel the unit if a gas type and ensure proper fueling and lubrication as recommended in the user’s manual. Fully turn on the water source prior to turning the machine on.
For 2-story buildings: Fit an extension arm to reach second floor surfaces. Never work from a ladder with a pressure washer – it could cause you to lose balance. Consider scaffolding if necessary.
Step 2 — Do a Test Spray First
Before you wash the entire surface, try it on a small, hidden spot—like a corner near the foundation or tucked behind a bush. Hold the nozzle around 3 feet away from the material and spray . Then, move gradually closer until you get the distance where it cleans well, but doesn’t mar anything.
If the paint chips , starts peeling, or you notice the surface looking worn or damaged at any distance, switch to a wider-angle nozzle, or just lower the PSI.
Step 3 — Apply the Cleaning Solution
Switch to the soap nozzle. Apply the detergent, start down low on the wall, and then work your way up. this stops that annoying streaking where the mix runs down over the grimy bits.
Apply the solution using a sweeping motion with overlapping strokes. Once applied, leave it alone for at least 5 to 10 minutes to allow the solution to work on the mold, mildew, and any stains that might have built up within the walls. Remember not to let it completely dry because if it does start drying, wet it down again using water.
If you’re dealing with textured surfaces like stucco, or rough brick, then take a soft bristle brush attachment and coax the solution into the pores before rinsing.
Step 4 — Pressure Wash Section by Section
Change to your 25° or 40° nozzle. Always work from top to bottom – washing down ensures that water contaminated with grime is washed off easily and does not create streaks.
Hold the nozzle at a 45° angle relative to the surface to clean effectively without causing water to push up behind the siding. Work at a uniform distance of 12–18 inches from the surface and make overlapping horizontal strokes.
Tackle areas at a time, approximately four to six feet wide, ensuring completion of each area before moving on to the next. In case of difficult-to-clean stains, come a little closer, but do not stand in one place.
Areas requiring extra care:
- Windows and trim: Use the 40° nozzle, stay further back, and never spray directly into seams or gaps
- Gutters and overhangs: Clean first, angling the spray downward; maintain your balance carefully
- Vents and electrical boxes: Keep the wand well away from these; use a brush instead if needed
Step 5 — Rinse Thoroughly with Clean Water
Once the section is washed , switch over to a wide angle nozzle, 40° , and rinse it down using clean water, again go from top to bottom. Be sure every bit of soap residue is completely cleared, because any lingering detergent may leave ugly streaking or cause a weird discoloration once it dries.
Pay close attention to the corners, window frames and the trim areas , thats where the suds like to congregate.
Step 6 — Dry, Inspect, and Touch Up
Shut down the equipment and let the pressure out of the machine by pressing the trigger, and then remove the hoses.
Let the outside dry out, for at least 24 hours, really let it settle. Then walk around, and check for any spots that got missed, still stained sections , or places that feel like they need another quick pass. And if you’re thinking of painting, be patient—wait a minimum of 48 hours. A few professionals even say go for 2 days of dry weather before you put on any primer, or paint.
Tips for Different Siding Types
Vinyl siding is the most durable and tolerates up to 3,000 PSI. Use a 25° nozzle and maintain a consistent distance. Avoid spraying upward into the seams.
Wood siding is more delicate. Keep PSI at 1,200–1,500 and use a 40° nozzle. Inspect for soft or rotted areas before washing — pressure will worsen any existing damage. Grain raised after washing is normal and will smooth once dry.
Stucco has a rough, porous texture. Use lower pressure (1,200–1,500 PSI) and a 40° nozzle with a wide sweeping motion to avoid chipping the surface.
Aluminum siding dents easily. Keep PSI moderate (1,500–2,000) and avoid the 0° or 15° nozzle entirely.
Brick is porous and can absorb water deeply. Use 1,500–2,000 PSI with a 25° nozzle and avoid prolonged spraying on mortar joints, which can erode over time.
Painted surfaces of any material: use the lowest effective PSI and a 40° nozzle. Check for existing paint that’s already peeling — pressure washing will accelerate flaking in those areas.
Common Mistakes to Avoid
Using too much pressure. More PSI doesn’t mean better results. Start lower than you think you need and increase only if necessary.
Spraying upward into siding seams. This forces water behind the siding and into the wall cavity, potentially causing mold inside the walls.
Using a ladder. The recoil force from a pressure washer can knock you off a ladder instantly. Always keep both feet on stable ground or use scaffolding.
Skipping the test spray. Taking 2 minutes to test a hidden spot can save you from damaging an entire wall.
Not rinsing completely. Soap residue left on the surface dries to a film, leaving streaks and dull patches.
Washing in direct summer sun. Cleaning solution evaporates too quickly, reducing its effectiveness and leaving residue behind.
DIY vs. Hiring a Professional
Cost Comparison
| Option | Estimated Cost |
| DIY (rent washer) | $50–100 |
| DIY (own washer) | $0 + time |
| Professional service | $200–420 for average home |
| Professional (per hour) | $25–100/hr |
When DIY Makes Sense
- Single-story home
- Moderate dirt and grime — no heavy mold infestation
- You’re comfortable with basic equipment setup
- Time available: expect 2–6 hours for a full exterior
When to Hire a Professional
- Two-story or taller home with no safe scaffold access
- Heavy mold, black algae, or years of buildup requiring specialized cleaning agents
- Delicate surfaces (historic brick, old painted wood) where damage risk is high
- You want the job done fast and guaranteed
Regular pressure washing — ideally once a year — keeps your home looking its best and helps prevent the kind of long-term buildup that leads to costly repairs. Whether you do it yourself or hire a pro, a clean exterior is one of the simplest ways to maintain and protect your home.

Leave feedback about this