For users who are using a Tiller for the first time, “rotary tillage depth” is often overlooked but extremely crucial. Correct ploughing depth not only improves soil aeration but also promotes root development, enhances plant absorption capacity, and makes subsequent planting more effortless and efficient.
Many common mistakes that beginners make include:
- Ploughing too deeply at one time caused the machine to jump
- The soil is still compacted due to being ploughed too shallowly
- Do not adjust the wheels or depth piles according to the soil conditions
- Adjusting the ploughing depth while the machine is in operation poses safety risks
This article will guide you step by step on how to correctly adjust the rotary tillage depth, so that your front-mounted, rear-mounted or 2-in-1 rotary tiller can all perform at their best.
Understanding Rotary Tillage Depth: Basic Knowledge
The ideal ploughing depth requirements vary in different scenarios:
Family garden, vegetable plot: 4-6 inches (10-15cm
Newly reclaimed plots: 6-10 inches (15-25cm)
Hard or clay soil: For the first time, it is recommended to be only 2-3 inches (5-7 cm), and gradually deepen it in several portions
How do the structures of different models affect the depth of ploughing?
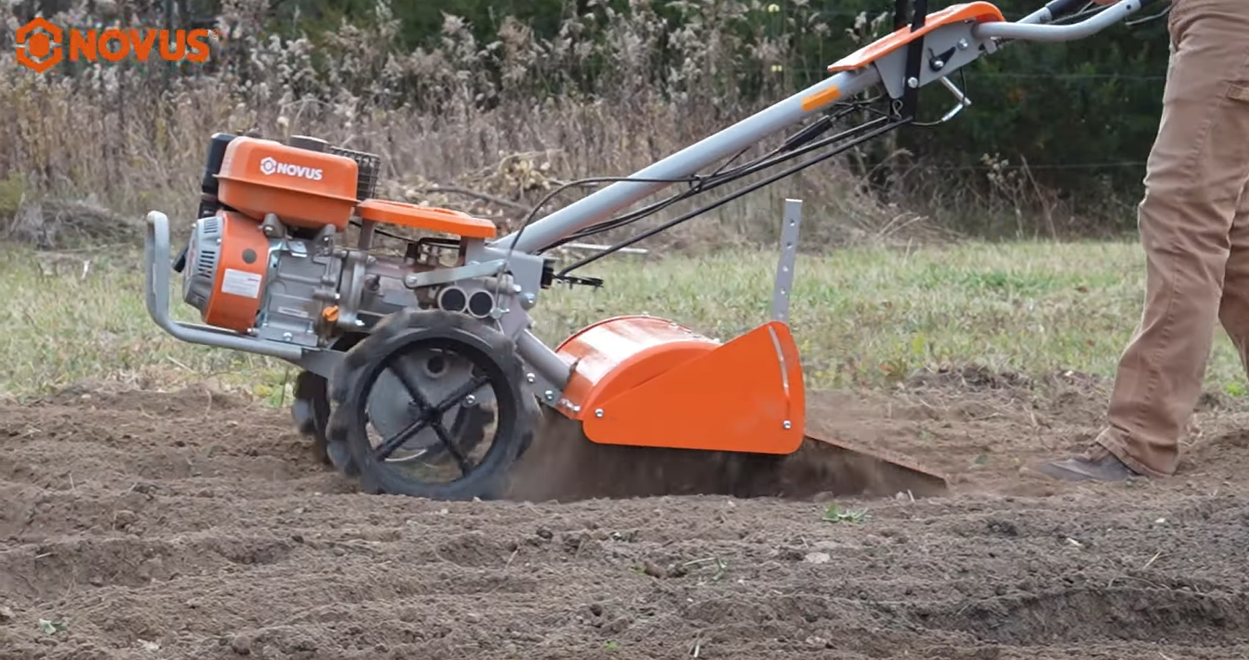
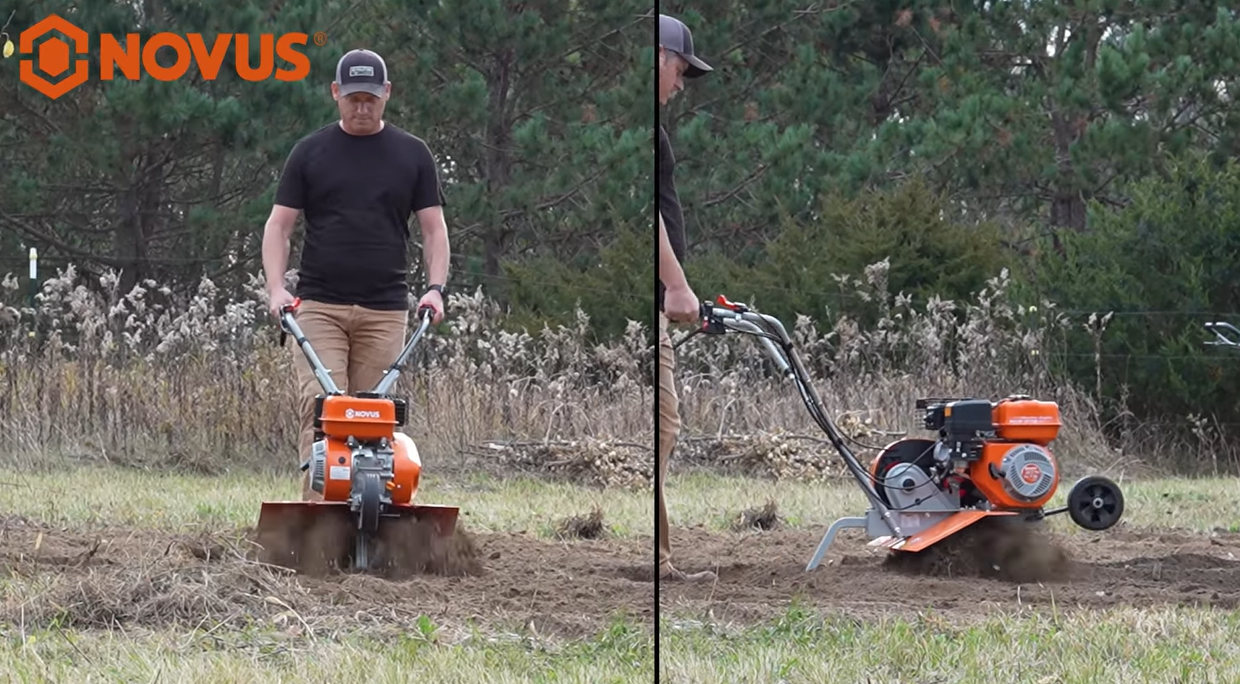
- Front Tine Tiller
The ploughing depth is jointly determined by the height of the wheels, the inclination Angle of the machine body and the Angle of the knife claws. It is flexible but requires multiple adjustments. - Rear Tine Tiller
Controlled by Depth Stake, and because the wheels are in the front, the stability is higher and it is suitable for deep cultivation. - 2-in-1 multi-functional rotary tiller
It can be switched between Tilling mode and loosening mode (Cultivating), and the depth adjustment method is more flexible.
How to Adjust the Tillage Depth on Different Types of Rotary Tillers?
Prerequisite for safe operation
The engine was turned off and the knife claws completely stopped rotating.
Release the clutch lever/Put it in neutral to ensure power is cut off.
The machine should be placed on a flat and stable ground to prevent it from toppling over or sliding.
The method for adjusting the tillage depth of a front-mounted rotary tiller
- Adjust the height of the wheels
Raise the wheels → the knife claws dig deeper
Lower the wheel → the depth becomes shallower - Control the tilt Angle of the fuselage
Slightly lifting it backward can allow the knife claws to penetrate deeper into the soil - Utilize the “downward force” that comes with the knife claws
It is easier to deepen the ploughing depth when advancing at a slow speed
It is suitable for light soil, garden renewal and shallow ploughing and weeding.
The method for adjusting the tillage depth of the rear-mounted rotary tiller
- The depth of ploughing is determined by using depth stakes
Lower the deep stakes → shallow ploughing
Deep pile heightening → In-depth cultivation - Forward rotation vs reverse rotation
Counter-rotating is more suitable for hard ground and allows for deeper plowing
The machine is more stable and less prone to jumping, making it suitable for deep cultivation in large vegetable gardens

The method for adjusting the tillage depth of a 2-in-1 rotary tiller
Switch between Cultivating (shallow tillage) mode or Tilling (deep tillage) mode
Fine-tune the height of the wheels and the Angle of the fuselage
It is suitable for family users who want to both loosen the soil and cultivate it deeply
How Can Beginners Correctly Adjust the Ploughing Depth?
Step 1 – Observe the soil condition
Is the humidity too high?
Are there any stones?
Is it very stiff?
Neither wet soil nor hard soil is recommended for deep ploughing at one time.
Step 2 – Start with shallow plowing
The first suggestion is only 2 to 3 inches in depth, which can:
Reduce the load of the machine
Avoid the claw of the knife getting stuck
Make the machine’s operation more stable
Step 3 – Gradually increase the depth
Adjust only one gear (1 notch) at a time, then run it for a test and observe the machine’s condition.
Do not adjust it to the deepest level all at once to avoid overloading or jamming the machine.
When the soil starts to loosen and the machine operates easily, gradually deepen it.
Step 4 – Complete the full tillage in several installments
The first time: Shallow plowing
Second time: Medium tillage depth (5-6 inches)
Third time: Final deep ploughing (7-10 inches)
Repeated tillage is more effective and safer than one-time deep tillage.
How Can One Achieve The Desired Tillage Depth Every Time?
Maintain a constant walking speed
Slow down when the soil is hard to give the knife claws time to sink
Avoid forcing it deeper
Use sharper and undamaged claws
Adjust the tillage depth according to the plant requirements
Lawn loosening soil: 2-3 inches
Vegetables: About 6 inches
Root and stem crops: 8+ inches
Insufficient Plowing Depth or Weak Machinery? First, Check The Mechanical Condition!
If there are situations such as unstable ploughing depth, weak machinery, or ploughing too shallowly, in addition to operational and soil factors, the following should also be checked:
Is the oil level sufficient
Whether the air filter is clean and installed correctly
Whether the clutch clue is normal and whether the clutch has been fully released
Check whether the belt and drive shaft are stuck or damaged
Check if the claws of the knife are sharp and free from any entanglements
The Most Common Deepening Mistakes Made by Beginners
A single “push to the bottom” caused the device to freeze
When farming in wet soil, the soil turns into a lump of mud
The wheels or depth stakes were not adjusted according to the model
Confuse the pre-tillage and post-tillage methods
Using blunt claws makes it difficult for the machine to sink
Recommended Tillers With Easy-to-adjust Tillage Depth
NV21FTG – 21-inch Front Rotary Tiller (212cc)
Suitable for gardens, light soil, shallow tillage and medium tillage.
NV18DRTG – 18-inch rear-mounted rotary tiller (212cc)
It features high stability and strong consistency in tillage depth, making it suitable for deep tillage on hard soil.
NV17FTG – 17-inch 2-in-1 Front Rotary tiller (79cc)
The single machine has both tillage and soil-loosening functions.
Conclusion
Mastering the adjustment of rotary tillage depth is not difficult. As long as it is operated from shallow to deep and in stages according to the soil condition, it is easy to obtain loose, well-aerated and suitable for planting soil.

Leave feedback about this